- $USD
- English (United States)
- Hire an Expert
- Get Support
How to Restrict Upload File Types for Different Users in WordPress?
August 1, 2023,
Allowing customers to upload fields on your WordPress website is one thing, restricting people based on their user roles to upload files is another task. If the website is poorly managed, it can enable users to upload unnecessary and even corrupt files. So, what should you do in this situation? It's essential to limit the file uploading permissions for users. This will be our main topic of discussion today.

 By diligently following all the steps outlined above, you should have successfully restricted file uploading on your website. Now, customize file uploading permissions and file size according to your specific requirements, and you can enjoy a seamless experience with your site.
Why should you Restrict File Uploading?
If the users have permission to upload files to your WordPress website, they might start uploading pointless, bulky, and damaging files. Although there are many advantages to this file uploading access, there are also some possible risks. You can only escape this undesirable situation by restricting file uploading permissions based on user roles.How to Restrict File Uploading Permissions on Your WooCommerce Store?
Restricting and managing file upload permissions is easier than it may seem. In this detailed guide, we will explain and make it easy for you to understand the process. There are two ways to carry out the task. One is through coding and the other one is to use a plugin. For the sake of this article, we will discuss only the WooCommerce Upload Files Plugin. The plugin is simple, easy to use, and highly functional. That makes it the ideal choice. The plugin will allow you to restrict file upload based on various conditions. So, let’s begin and see how you can utilize the WooCommerce customer upload files plugin to restrict file upload.
Step 1: Install the WooCommerce upload files plugin
- Download the Customer Upload Files for WooCommerce plugin.
- Go to the WordPress admin panel, in the Plugins section, click on “Add New” and upload the .Zip file that you downloaded earlier.
- Proceed to install the plugin.
- After successful installation activate the plugin.
Step 2: Go to Upload Files Configuration Settings
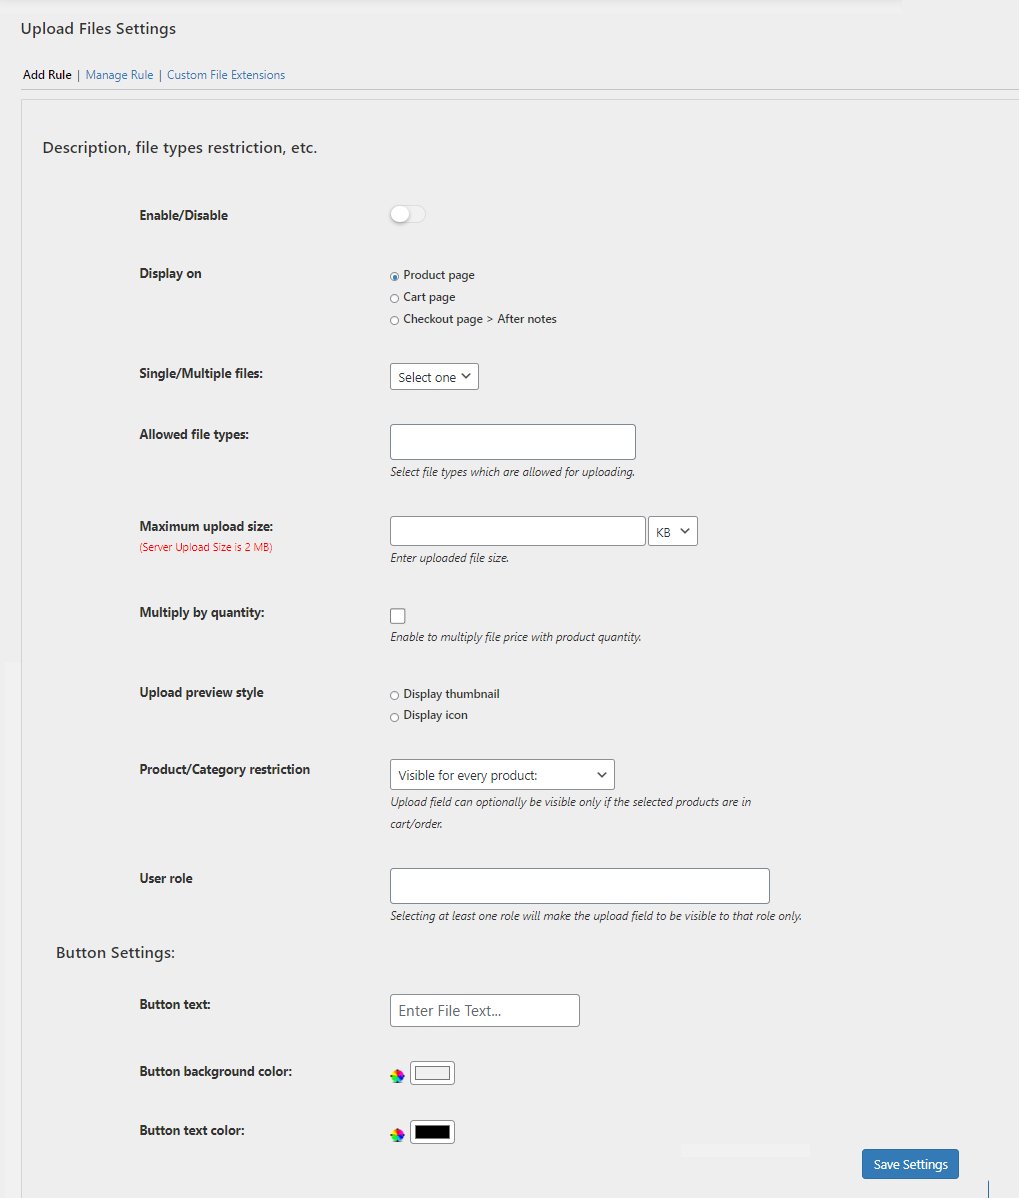
In the admin panel, go to WooCommerce > Setting > Upload Files to configure all settings for the WooCommerce file upload plugin. In the Upload Files tab, you will find two sections “Add Rule” and “Mange Rule”. The next step is to create rules to restrict file upload. To do so, in the “Add Rule” section follow the below steps.- Enable the plugin.
- Select where you want to display the file upload button on your WooCommerce store. You have the option to display the button on the product page, cart page, or checkout page after notes.
- Choose if you want to allow uploading single or multiple files. The following settings can be set for both single and multiple files.
- Set price limit to enable upload file
- Based on the discount type (fixed or percentage)
- Make the upload file required if necessary
- You can hide details on the website frontend
- Enable to allow customers to add descriptions for further details
- Admin can also select which types of files are allowed to upload.
- Set the maximum size to upload the file.
- Select the specific products, categories, or all products for which you want to enable the upload file option.
Step 3: Restrict File Upload Based on User Roles
After configuring all the above-mentioned settings the next step is to configure the upload file option based on different user roles. Here you can select specific user roles for which you want to allow file upload. Create multiple rules based on your requirements to restrict upload files. By default, WooCommerce has the following user roles- Administrator
- Editor
- Contributor
- Subscriber
- Customer
- Shop manager
- Go to WooCommerce > Settings> Upload Files > Custom File Extensions. In this section, the administrator can include custom file extensions that are currently not supported by the WooCommerce upload files plugin. Multiple file extensions can be added, and they should be separated by commas.
Step 4: View, Download & Approve/Disapprove Customer Uploaded Files
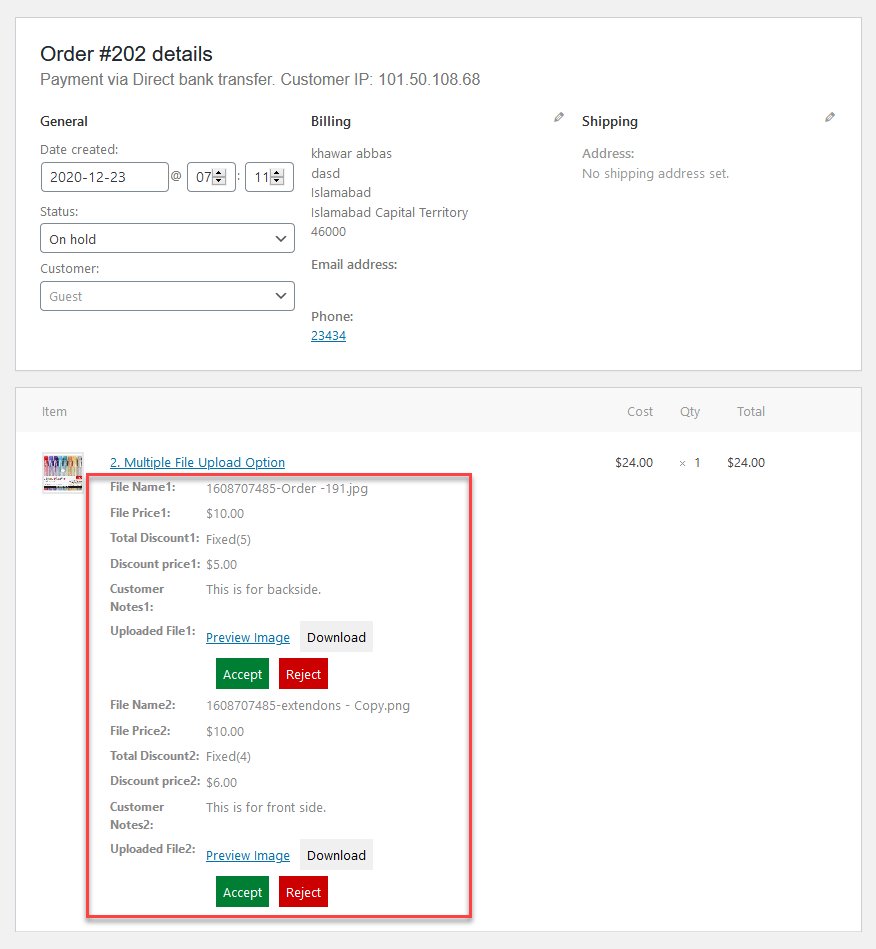
To access the files uploaded by the customer, you need to open each order individually. Once opened, you have the option to approve or disapprove the files and download them as needed. Depending on which page the customer uploaded the file, you can access them as follows:- When customers upload a file from the product page, the uploaded file will be visible in the "Item" section of the order detail page.
- When customers upload a file from the cart or checkout page, the uploaded file will appear at the bottom of each order in the "Upload File" section.
 By diligently following all the steps outlined above, you should have successfully restricted file uploading on your website. Now, customize file uploading permissions and file size according to your specific requirements, and you can enjoy a seamless experience with your site.


